We live in Georgia and my yard is nothing but red clay. It's not dirt, it's not soil. Planting a garden in the red clay just does not work. We have to import soil and this just washes away with every rain. A good location for a garden would be right off my deck, away from the dog's yard. We have a ton of bird and rabbits but I'm pretty sure a raised flower bed would still work. Talking to other gardeners in our area I have few ideas now of my own to makes two raised bed which would be easy to put together ( meaning by myself ) Everything you will need you can get at the Home Depot store. Home Depot will cut all the wood for you right there which makes this project super easy to put together.
You will need:
32 three inch decking screws.
2 4x4 by 8 non-pressure treated posts: cut into 9 inch sections. you will need
8
3 10x12 foot non- pressure treated boards. Cut one board into 4 three foot section
cut the other two boards in half making 4 six foot sections.
You will have wood left over.
This will make you two six foot raised flower beds. Having them cut at Home Depot makes it easy to get your wood supplies back home. I'm using non-pressure treated wood because I want to use wood that has not been treated with chemicals that will likely end up in my food. twelve bags of top soil in each box with two additional bags of peat moss mixed in.
Each box will need 2 three foot boards for the ends and 2 six foot boards for the sides. You'll need 4 of your 9 inch 4 x 4 post for the insides. Use your deck screws to put the box together. Power tools for great for this project. Each bed took me 10 min to put together.
For a last min project two months late, I'm pretty happy over all with how it all turn out. Next spring I'll be ready to have these two boxes filled to the brim with seedlings ready to grow. I might even add another two boxes.
Showing posts with label home & garden. Show all posts
Wednesday, November 18, 2015
Thursday, August 22, 2013
Pantry Revamp, Part 3: Organization and Finishing Touches
Last time, we talked about how adding shelves to the space between my
existing shelves and door gave me a new space for canned goods, but I
was still struggling with finding a way to organize our food in a way
that let me find everything I needed. Creating "zones" didn't work since
things were already overcrowded and everything had to be shifted to
reach an item. Wine crates and baskets didn't work since, while they held things in
certain groups, they were bulky and hard to dig through, not to mention
that they blocked the view of other areas.
Here's a before shot of my pantry (note that a big box of jumbled stuff has been removed from the bottom shelf here while I measured):
In fact, here's the contents of my pantry all over the floor (minus the paint can):
I loved the idea of having everything in stackable, clear containers like these from the Container Store, but at $15-$20 each and not quite big enough for many of my bulk jars, it just wasn't meant to be. I forced myself to browse around the organization section at Home Depot to search for cheaper alternatives, and came across these:
They're perfect! I bought all they had (then promptly returned them since Target had the exact same bins for cheaper than this price).
I also bought several cheap plastic shoe bins (at 99 cents each, this was so much better than the container store!) for smaller items, and to organize some other things in my kitchen.
The result? All my pantry items are organized by category, in lightweight containers that are easy to move around, lift, and see straight into! (I can even look up through the wire shelves to see what's left in the top containers!)
Big Bins:
Oatmeal, Breadcrumbs, Grits, & Cream
of Wheat
Rice & Beans
Syrups, Spices, Sauces, & Flavorings
Pasta & Asian Wraps
Dried Fruit & Nuts
Small Bins:
Snacks & Sweets
Baking Items, Specialty Flours, Sugar
Coffee, Tea, Drink Mixes, & Straws
Small Bins in another kitchen cabinet:
Measuring Cups & Small Baking Dishes
Kitchen Aide Accessories & Small
Electrics
The only thing that's really changed from here to now is the jar of coffee; it's moved to the space above our coffeemaker somewhere else in the kitchen.
I made my labels small with the intent that they wouldn't block the view as much this way, but now I think they're a bit too small! I love the font, though (you can get it here for free!). It's just enough of that "fancy froo froo kitchen" to make me smile, without having get through life with a 2-cup container of flour.
These two photos are present day. It's been about 4 months since I added the big containers and I still feel like I can find everything in my pantry. It's trivial now to check and see if I have a particular pasta or bean I want for a recipe, and I'm never out of canned tomatoes!
Wednesday, August 21, 2013
Pantry Revamp, Part 2: The Shelves
Part 1 in this series was all about the prep work, and now we're on to Part 2: the actual shelves! I remember standing back and looking at the pantry immediately after putting these up and thinking that it was such a small impact for so much work, but months later, I can't imagine my pantry without these!
First up, measuring! I measured from the wall's edge to the top of the doorjamb, and from the edge of the shelves (see below) to the back of the doorjamb. I used these measurements to figure out what type of wood to buy...these boards ended up being the perfect dept for shelves without interfering with the door, and without me having to cut them more than once.
Once I cut the boards to the proper width, I attached simple corner brackets to the wood and labeled each shelf with a unique number.
With a pencil, I made sure each shelf was level and at the space I wanted and marked where the top of the board and screw holes were. By now I've about had it with this project and forgot to take more pictures...but imagine hammering drywall anchors into each screw hole, painting all the shelves, then screwing them into their specific spots on the wall!
I also took some of the long screws I was using and re-attached our "temporary" spice rack to the door. Since the shelves don't go beyond the doorjamb, the door still closes without issues. I also took some picture frame wire and made a bit of a "belt" to hold up those boxes on top of the spice rack...it's barely visible, but lets us open and close the door without the boxes moving at all.
Unfortunately, while the shelves freed up a lot of space and kept my canned goods in view...they did not solve the issue of losing everything in the deep pantry shelves. The above photo is current, but after finishing the shelves my pantry still looked something like this:
Part 3 is all about how I organized this small pantry on an even smaller budget!
Tuesday, August 20, 2013
Pantry Revamp, Part 1: The prep work
It's not news that having a small pantry has been a big challenge for me, but after tons of trial and plenty of error, I finally have a setup that works! It took a lot of time and steps to get to this point, so I'm breaking this up into 3 posts. This is Part 1!
So a while ago (many months, egad!), I posted this photo:
While my husband was working from home one day, I heard a loud crash downstairs. We both ran to find that the temporary spice rack had fallen to the floor. The tiny nails I had used to hang it just weren't strong enough to hold up all those glass jars. Despite the mess here, I was thrilled to find that only 2 spice jars were actually broken.
Since it was a temporary solution anyway, I took some measurements and bought some wood, fully planning to make a new, custom shelving unit for the door. I had sketched out plans and everything, and bought all the wood I'd need....except that I've never worked with actual wood before, so I assumed that a 2x4 was 2 inches by 4 inches. For anyone else who apparently missed this big memo...wood is measured by its "green" size, before it's dried out and shrunk, so what you buy in the store is a good half inch smaller all around. The particular boards I had purchased for the door shelving turned out far too small to work, so I had to return them, and came home with some supplies to add some small shelves around the inside of the pantry instead.
Of course, as I was putting these in....I realized that the inside of the pantry was horridly dirty looking (you can see some of the odd scribbles here). The walls looked like someone had taken an entire box of crayons and scribbled all over...and I'm pretty sure this was never painted before. So, I emptied out the entire pantry and painted it.
(This was a great opportunity to throw out anything we didn't need, but it still wasn't enough. More on that later!)
This moment of hilarity happened while trying to get our extra shelf out...I had to break out the rubber mallet to get it apart.
I also scrubbed the existing shelves, some of which were oddly colored in spots and had some gunk that wasn't ours. Ew. I'm just glad they fit in the bathtub. I tried several cleaners, but in the end a simple mixture of dish soap and baking soda with some elbow grease got them looking like new again.
Since the stains inside the pantry were so bad, I primed all the walls first, then followed up with a coat of regular white trim paint we had lying around.
I'll explain how I build and installed the new side shelves in Part 2!
Since the stains inside the pantry were so bad, I primed all the walls first, then followed up with a coat of regular white trim paint we had lying around.
I'll explain how I build and installed the new side shelves in Part 2!
Monday, August 12, 2013
My Mess Under The Kitchen Sink
I'm one of "those" people who put everything under the kitchen sink. I try and rearrange the mess oh every year or so, but looking for a matching pair of dish gloves set me off to find another solution to my mess.
A trip to Big Lots and $5.00 later, I found a solution. I'm going to use the door to my laundry room which is 5 feet from the kitchen.
Gloves found. This is so much better...why didn't I do this years ago? I hope this helps some of you with your "Mess under the kitchen sink." I wonder what I can organize next!
Thursday, March 7, 2013
Winter Birds in Georgia
Today is a cold day here in northern Georgia. My husband gets himself out early to feed the birds. Dave's love for nature is something I really love about him. I truly believe that animals in nature feel a true sense about humans. I love watching my husband feed the birds and once in a while I remember to grab my camera and take pictures.
The birds will eat right out of Dave's hand...it just amazes me to no end.
We have some really beautiful birds here, unlike the ones I grew up with in California.
Spring will be here in a few weeks and I'll take more pictures of our ever-turning yellow finches. Our hummingbirds should be back soon and I can't wait to show you!
Just another Thursday morning at Zabrina's house.
Wednesday, February 27, 2013
Small Pantry Tips
I've mentioned our pantry issues in passing before. I'm always looking for ways to make it more functional, but here are some things that have worked for me so far!
Also, this is a long post; feel free to scroll to the summary of tips at the end!
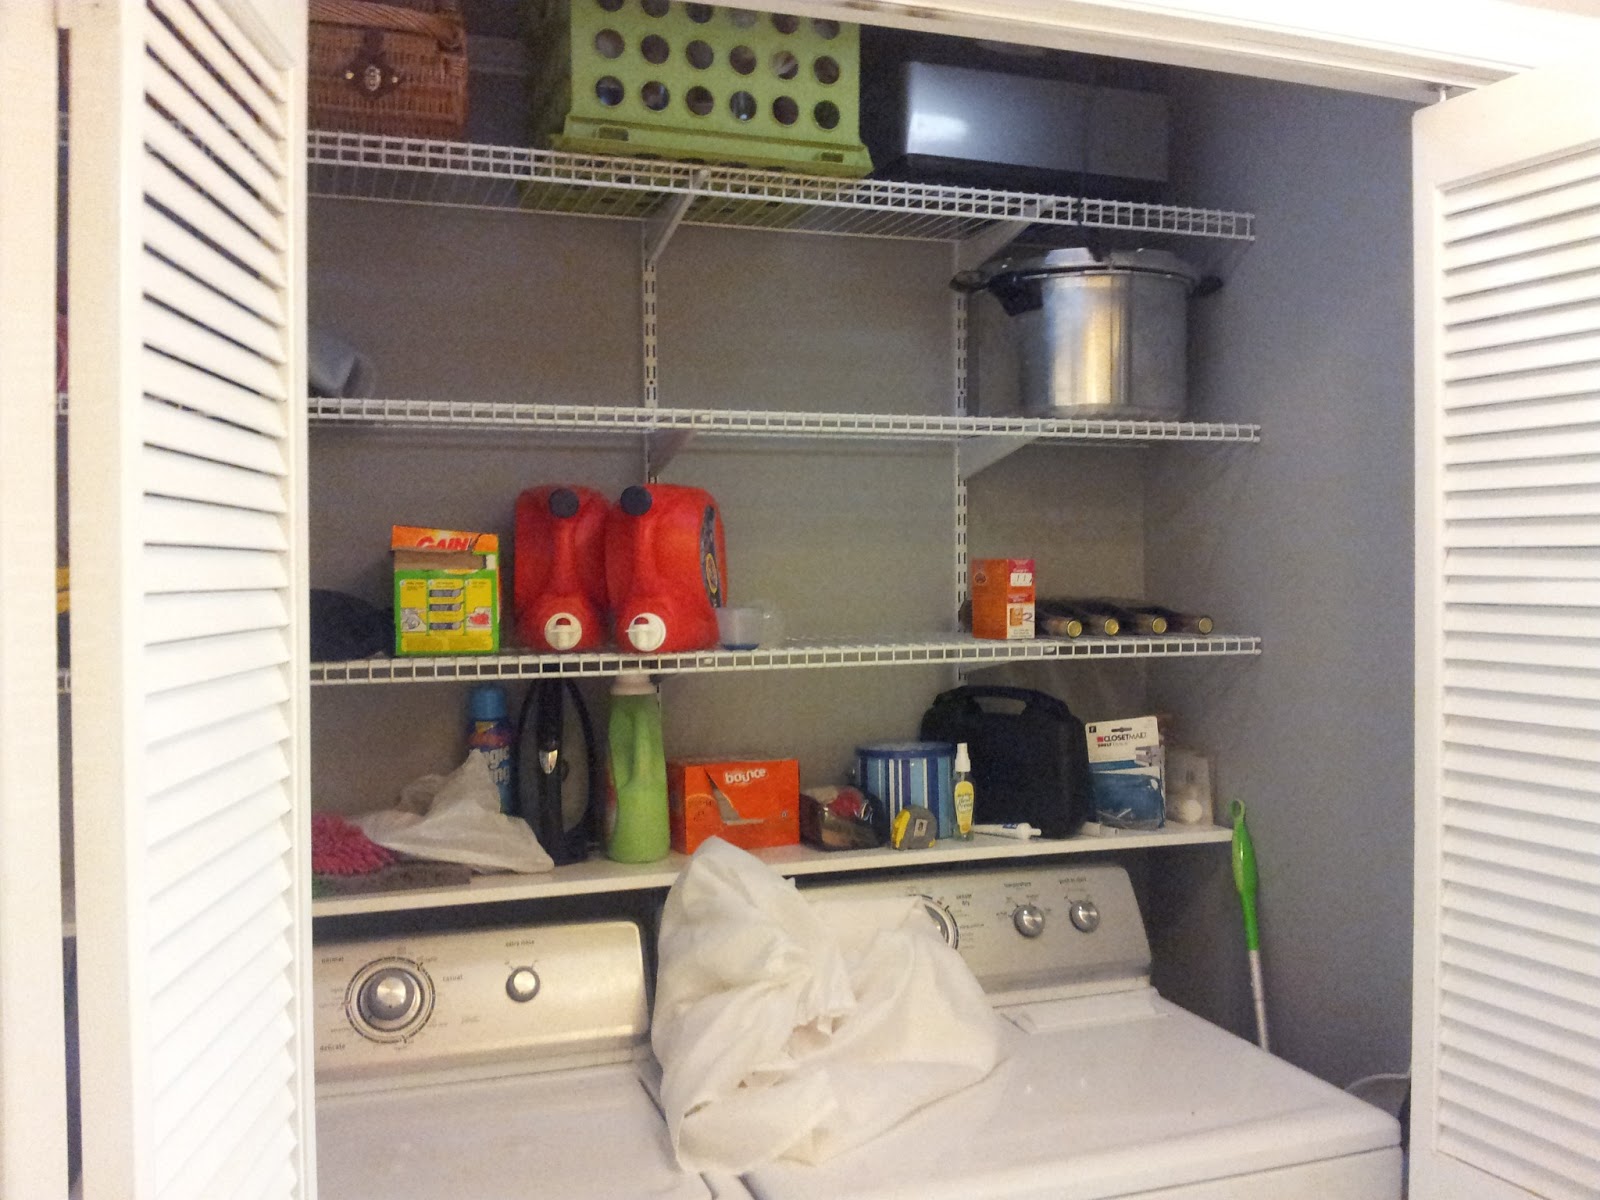
There's a lot going on in this picture, so I'll start from the top shelf and work my way down. I currently have this shelf split into "flours" and "pastas." I keep my flour in that big stainless container to keep the mess down. Our shelves are narrow, but deep, so I try to push everything to the back as much as possible to keep it all in view.
Next shelf down: I've created an elevated area with a box of empty jars, which allows me to use more of the space without blocking the view as much. I also have a thin, plastic cutting board laying across the wire shelf to block the gaps. This keeps my smaller bottles of vinegar, oils, etc. from tipping and catches any possible spills.
Underneath the wire shelves, you can see on the left that we removed one shelf and put this breakfast cart in the pantry instead. It adds a (gap-less!) flat surface and 2 more shelves. The middle shelf on the cart pulls out - picture below. The bottom one holds distilled water and some less-used kitchen appliances.
Since this shelf is at knee-level, I label everything on the top. We tend to buy most of our dry goods in bulk, so jars of all sizes come in handy for storage. Can you tell I love split peas? ;)
We try to limit how many plastic bags come home, but they do come in handy now and then. When I ripped one of our reusable grocery bags on the way home one day - I cut it up, sewed it into a tube, and added some elastic to the bottom. Now we have a double-recycled plastic bag dispenser! This has saved us a lot of space and frustration, since before we were literally stuffing them into one of the lower shelves in the pantry. We're now limited to what we can keep in the sock, and anything else goes into recycle.
Here's the last thing I've added lately. Before this, there was a tacky off-white plastic thing that was supposed to hold the boxes. You can see a corner of it in the top picture of this post - I disliked it so much I never got a good shot of it! For about $10, I bought this shower organizer that happens to have a bunch of hooks at the bottom, and happens to match the oil-rubbed bronze of our sink.
It's a temporary solution, but it took over the job of the plastic thing AND cleared out 2 drawers: my spice drawer, and a towel drawer. I'll get a better spice system eventually, but for now, having them in a double-layer on this shelf isn't too annoying.
This turned into quite the long post! Here is a summary of my tips for working with a small pantry:
1) Keep bulk items in containers to minimize mess and maximize usable space. Clear is best, and mason jars stack great!
2) Elevate canned goods to create more visible layers. I used a box of empty jam jars to elevate a second layer of canned goods.
3) Use flexible cutting boards to block gaps in wire shelves for smaller items.
4) Don't be afraid to take some shelves out and put a piece of furniture in your pantry! Flat surfaces and multiple drawers can be so much more useful.
5) Label, label, label. When things are already cluttered due to space, it can be frustrating trying to find a certain jar/can/box of something in a sea of things that look the same from the top or sides.
6) Limit the things you don't use as often. By using a bag sock, we don't have a shelf overflowing in bags we will never use; once the sock is full, we'll recycle any new bags. I also keep my less-used spices in the freezer to save on pantry space and to keep them fresh longer.
7) Take organizational techniques from the rest of the house. Our over-the-shower organizer freed up two drawers by holding spices and giving us a place to hang towels and potholders.
Do you have any tips for making the most of a small pantry? I need all the help I can get!
Monday, February 11, 2013
DIY Spice Rack.
While my daughter was here recently she commented on my messy pantry. I went on to tell her that my pantry was fine and I knew where everything was. So she did the unspeakable and asked me where the onion powder was and I couldn't find it. Point taken. Here is my step by step on how I made my pantry spices easy to find.
First I went to Home Depot and found a 10 inch by 24 inch piece of steel.
Then I went to Hobby Lobby and found a frame 10 inch by 24 inch at 50% off.
A package of mounting pins from Hobby Lobby.
I put my new spice board together in less than ten minutes. It was so easy.
My daughter and I made a trip to World Market where we found these great tins on sale for $1.50 each. They have a magnetic disk on the bottom. I went with colors tins to make it easier to find what I need. Red for hot or Mexican spices, green for dill weed, parsley, etc.
I have to say this was a fun project and my pantry got a thorough cleaning to go with my pretty new spice station.
Hopefully my next project will be this fun!
Until next time, happy crafting!
Zabrina
Thursday, February 7, 2013
Spring Cleaning - Laundry Closet Redesign!
"A place for everything, and everything in its place."
This has been my new maxim while reorganizing our current house. One of our biggest issues here is storage; without much furniture and hardly any closet space, there simply isn't enough room for even the basics. It's been my goal while searching for a new job to also spend some time making our home more cozy and functional. The laundry room re-do is probably my favorite project so far!
Here is our laundry "room" before. It's a closet off the small hallway between our garage door (on the left here) and our kitchen.
You can see how the previous owners left it: a single, poorly installed shelf, stained walls, and a couple of nails in odd places.
First thing first! I ripped out the old shelving (keeping the shelf, since I chose a shelving system that could re-use it). They used drywall anchors rather than properly hanging anything on studs, so there were a lot of big holes to fill.
Once all the spackle was dry, I painted the whole inside of the closet a medium gray. This color was on the "rejected colors" shelf at home depot and was one of those nifty paint-and-primer in one types that are normally a bit pricey. I paid $7 for this gallon and didn't even use a quarter of it!
The next big thing was the shelving! One of the things I did like about the previous "design" was the style of shelf. These wire shelves are very sturdy, the gaps aren't big enough for much to fall through, and the lack of flat surfaces means less dust collection. The shelves were easy to cut to size with a metal saw.
I took it a step further and went with a track shelving system that would allow us to change the height of our shelves to fit whatever we decide to put here. The main anchor is at the top of the wall, shown here. I'm very lucky to have an amazing husband who patiently walked me through every step, and completed all the work for me when I got tired. He also decided that we needed more light in there, and purchased and installed the light fixture for me.
For the bottom shelf, I wanted to ensure that nothing could fall behind the washer and dryer, so I took an idea from Pinterest and put a wood shelf right along the top of the machines.
We gained so much storage space with this that we still don't have it filled up, months later. I love that the shelves are easy to move (we've already moved them twice!) and that it would be trivial for us to add another in the future. I'm looking forward to this summer now that we have space to store all of the canned fruits and veggies we love to make!
I still need to install hooks on the sides of the closet for the ironing board, brooms, and other things, but overall I'm pretty pleased with the outcome.
Now, if only I could make my pantry this functional.... :)
How have you solved some storage issues in your home?
Subscribe to:
Posts (Atom)


